Showing posts with label python. Show all posts

Saturday, 28 March 2020

PyInstaller Extractor updated to v2.0

PyInstaller Extractor has been updated to version 2.0. This has been long overdue. The project is now migrated to GitHub and all further development will take place over there.

https://github.com/extremecoders-re/pyinstxtractor

Version 2.0 includes support for Python 3.7 and above. Earlier, the script used to generate invalid pyc files when extracting exe's generated from Python 3.7. This was because from Python 3.7 onward, the pyc header format slightly changed.

Also starting from this version, I am moving away from traditional version numbering. Instead you can always find the latest version on GitHub.

Saturday, 2 December 2017

Reversing a PyInstaller based ransomware

Occasionally, I get questions about how to unpack PyInstaller executables using pyinstxtractor, how to identify the script of interest among the bunch of extracted files etc. In this post, I intend to cover all of these. Let's get started.

The file for our purpose is a recently identified ransomware having the following SHA256 hash.

Sample Hash: 53854221c6c1fa513d6ecf83385518dbd8b0afefd9661f6ad831a5acf33c0f8e
Download from Mega (Password: infected)

Preliminary Analysis

The executable "hc6.exe" has the following icon. The icon itself is a tell-tale sign that it's a PyInstaller executable.
Figure 1: Icon
Another way we can identify such files is by dropping it in a hex editor. A PyInstaller generated executable has many strings referencing python, towards the end of the binary.

Figure 2: Strings

A PyInstaller executable consists of two parts - a bootloader and a zlib archive appended to it as an overlay. The purpose of the loader is to set up the Python environment for running the application. This includes loading the Python DLL from the filesystem or from memory when the DLL is bundled within the executable. After going through a series of operations, finally it executes the main script and the control is transferred to user code. The loader also sets up hooks for resolving imports which are embedded within, the details of which are beyond the scope of this post. You can refer to the source for more information.

Extracting

Knowing that the sample is a PyInstaller generated executable we can proceed to extract its contents using pyinstxtractor as shown in Figure 3.

Figure 3: Running pyinstxtractor
The latest version (1.9) of pyinstxtractor shows which scripts are the possible entry points to the application. These are the python scripts which are run when the application is launched. Naturally, we want to begin our analysis from here. In this sample, it has identified  pyiboot01_bootstrap and hc6 as the entry points. Among the two, the former is PyInstaller specific and not of interest. The other one named hc6 does sound interesting. Let's have a look at the contents of the extracted directory before analyzing the file hc6.

Figure 4: The extracted contents
Within the extracted directory we can see a bunch of stuff - DLL files, Python C Extensions (PYD) and also a sub-directory out00-PYZ.pyz_extracted. This nested sub-directory just contains compiled python files (PYC) as shown in Figure 5. The pyc files are from the standard python library or from a 3rd party library such as PyCrypto. Hence, in this sample, we can exclude these files from analysis.

Figure 5: pyc files inside the pyz

Decompiling the main script

The main script or the entry script is named hc6, let's have a look in a hex editor.

Figure 6: hc6 in a hex editor
This does not look like python code, does it? However, this was not the case in earlier versions of PyInstaller, where the main script was left as-is, in plain text. Recent versions, compile the py source to bytecode before packaging it in the executable.

We now want to decompile this bytecode file back to python source, however, in its present form a decompiler wouldn't recognize this as a valid pyc file. The reason for this is that the magic value (i.e. the signature) is missing from this file header. A Python 2.7 pyc file begins with the bytes 03 F3 0D 0A followed by a four-byte timestamp indicating when this file was compiled. We can add these 8 bytes as shown in Figure 7.

Figure 7: Adding the missing header
With the above changes, we can now feed this file to a decompiler such as pycdc. In case you do not want to compile yourself, I have provided precompiled binaries at AppVeyor. Decompiling we get back the source.

Analyzing the ransomware

Finally, we can have a look at the ransomware in all its glory. It encrypts files from the following list of extensions.
.txt, .exe,  .php, .pl, .7z, .rar, .m4a, .wma, .avi, .wmv, .csv, .d3dbsp, .sc2save, .sie, .sum, .ibank, .t13, .t12, .qdf, .gdb, .tax, .pkpass, .bc6, .bc7, .bkp, .qic, .bkf, .sidn, .sidd, .mddata, .itl, .itdb, .icxs, .hvpl, .hplg, .hkdb, .mdbackup, .syncdb, .gho, .cas, .svg, .map, .wmo, .itm, .sb, .fos, .mcgame, .vdf, .ztmp, .sis, .sid, .ncf, .menu, .layout, .dmp, .blob, .esm, .001, .vtf, .dazip, .fpk, .mlx, .kf, .iwd, .vpk, .tor, .psk, .rim, .w3x, .fsh, .ntl, .arch00, .lvl, .snx, .cfr, .ff, .vpp_pc, .lrf, .m2, .mcmeta, .vfs0, .mpqge, .kdb, .db0, .mp3, .upx, .rofl, .hkx, .bar, .upk, .das, .iwi, .litemod, .asset, .forge, .ltx, .bsa, .apk, .re4, .sav, .lbf, .slm, .bik, .epk, .rgss3a, .pak, .big, .unity3d, .wotreplay, .xxx, .desc, .py, .m3u, .flv, .js, .css, .rb, .png, .jpeg, .p7c, .p7b, .p12, .pfx, .pem, .crt, .cer, .der, .x3f, .srw, .pef, .ptx, .r3d, .rw2, .rwl, .raw, .raf, .orf, .nrw, .mrwref, .mef, .erf, .kdc, .dcr, .cr2, .crw, .bay, .sr2, .srf, .arw, .3fr, .dng, .jpeg, .jpg, .cdr, .indd, .ai, .eps, .pdf, .pdd, .psd, .dbfv, .mdf, .wb2, .rtf, .wpd, .dxg, .xf, .dwg, .pst, .accdb, .mdb, .pptm, .pptx, .ppt, .xlk, .xlsb, .xlsm, .xlsx, .xls, .wps, .docm, .docx, .doc, .odb, .odc, .odm, .odp, .ods, .odt, .sql, .zip, .tar, .tar.gz, .tgz, .biz, .ocx, .html, .htm, .3gp, .srt, .cpp, .mid, .mkv, .mov, .asf, .mpeg, .vob, .mpg, .fla, .swf, .wav, .qcow2, .vdi, .vmdk, .vmx, .gpg, .aes, .ARC, .PAQ, .tar.bz2, .tbk, .bak, .djv, .djvu, .bmp, .cgm, .tif, .tiff, .NEF, .cmd, .class, .jar, .java, .asp, .brd, .sch, .dch, .dip, .vbs, .asm, .pas, .ldf, .ibd, .MYI, .MYD, .frm, .dbf, .SQLITEDB, .SQLITE3, .asc, .lay6, .lay, .ms11 (Security copy), .sldm, .sldx, .ppsm, .ppsx, .ppam, .docb, .mml, .sxm, .otg, .slk, .xlw, .xlt, .xlm, .xlc, .dif, .stc, .sxc, .ots, .ods, .hwp, .dotm, .dotx, .docm, .DOT, .max, .xml, .uot, .stw, .sxw, .ott, .csr, .key, wallet.dat
Encrypted files have an extension of .fucku appended to the original filename. This can be seen in the decompiled code as shown below.

Figure 8: Supported extensions
Files are encrypted with the AES cipher in CBC mode with a random IV generated per file.

Figure 9: Files are encrypted using AES

AES is no doubt a strong algorithm and infeasible to crack. However, the ransomware encrypts each file using a constant and hardcoded key which makes decryption feasible. This is shown in the figure below. The AES key used is j<L;G|hD*3CQk%I!g|Ei&#aQ6*;Vh,

Figure 10: Look, the password is hardcoded!

Decrypting encrypted files

Since we know that each files are encrypted with the same key we can develop a decrypter. However, our kind ransomware author has spared us the bother by providing the decrypter in the same code.

Figure 11: Bundled decrypter

The function decrypt decrypts an encrypted file. It's not called from anywhere, indicating it was there for testing purposes and was not removed in the final build.

There is no need to pay the ransom if someone is infected by this ransomware. A free decrypter is available from the malware hunter team. Kudos to them for their fabulous work!

Wednesday, 29 November 2017

Pyinstaller Extractor updated to v1.9

PyInstaller Extractor has been updated to v1.9. The features of this release includes:

  • Support for Pyinstaller 3.3
  • Display the scripts which are run at entry point 

Support for Pyinstaller 3.3

Self explanatory. For extending the support to Pyinstaller 3.3 no major changes had to be introduced. The earlier script works as-is.

Display the scripts which are run at entry point

A Pyinstaller executable have many embedded files in it. Naturally, users of this tool had difficulty identifying which of the extracted files are of interest. With this update, pyinstxtractor now shows a list of python scripts which are run by the executable at load time. An example is shown in the screenshot below.


pyiboot01_bootstrap and main are the scripts which are run at load time. Out of this two, the former is Pyinstaller specific and not interesting for our purpose. Hence you should start the analysis from the file named main located within the _extracted directory.

As usual, pyinstxtractor can be found at SourceForge.

Tuesday, 11 July 2017

Deobfuscating PjOrion using bytecode simplifier

Bytecode simplifier is a tool to de-obfuscate PjOrion protected python scripts. This post is a short tutorial to show how to use this module to deobfuscate a protected python script.

I have used the sample code below to demonstrate its usage. This is a small program to calculate the factorial of a number.

# Python program to find the factorial of a number using recursion
 
def recur_factorial(n):
   """Function to return the factorial
   of a number using recursion"""
   if n == 1:
       return n
   else:
       return n*recur_factorial(n-1)
 
 
# take input from the user
num = int(input("Enter a number: "))
 
# check is the number is negative
if num < 0:
   print("Sorry, factorial does not exist for negative numbers")
elif num == 0:
   print("The factorial of 0 is 1")
else:
   print("The factorial of",num,"is",recur_factorial(num))

Monday, 10 July 2017

Introducing bytecode simplifier

Bytecode simplifier is a tool to deobfuscate PjOrion protected python scripts. It is a complete rewrite of my earlier tool PjOrion Deobfuscator. I have reimplemented the deobfuscation functionality from scratch and have used networkx specifically for this purpose. Using networkx made reasoning about the code much simpler.
The PjOrion version used is 1.3.2 (Filename: PjOrion_Uncompyle6_01.10.2016.zip)

The code is at https://github.com/extremecoders-re/bytecode_simplifier

A short tutorial can be found here: https://0xec.blogspot.com/2017/07/deobfuscating-pjorion-using-bytecode.html

Sunday, 26 March 2017

67,000 cuts with python-pefile

EasyCTF featured an interesting reversing engineering challenge. The problem statement is shown in Figure 1.
Figure 1: Problem statement
A file 67k.zip was provided containing 67,085 PE files numbered from 00000.exe to 1060c.exe as shown in Figure 2.

67k files to reverse
Figure 2: 67k files to reverse!


Thursday, 16 March 2017

Hacking the CPython virtual machine to support bytecode debugging


As you may know, Python is an interpreted programming language. By Python, I am referring to the standard implementation i.e CPython. The implication of being interpreted means that python code is never directly executed by the processor. The python compiler converts the source code into an intermediate representation called as the bytecode. The bytecode consists of instructions which at runtime are interpreted by the CPython virtual machine. For knowing more about the nitty-gritty details refer to ceval.c.

Unfortunately, the standard python implementation does not provide a way to debug the bytecode when they are being executed on the virtual machine. You may question, why is that even needed as I can already debug python source code using pdb and similar tools. Also, gdb 7 and above support debugging the virtual machine itself so bytecode debugging may seem unnecessary.

However, that is only one side of the coin. Pdb can be used for debugging only when the source code is available. Gdb no doubt can debug without the source as we are dealing directly with the virtual machine but it is too low level for our tasks. This is akin to finding bugs in your C code by using an In-Circuit Emulator on the processor. Sure, you would find bugs if you have the time and patience but it is unusable for the most of us. What we need, is something in between, one which can not only debug without source but also is not too low-level and can understand the python specific implementation details. Further, it would be an icing on the cake if this system can be implemented directly in python code.

Tuesday, 14 February 2017

Extracting encrypted pyinstaller executables

UPDATE: For recent PyInstaller versions, the script below won't work. Please visit the pyinstxtractor wiki for more information.
 
It has been more than a quarter since the last post, and in the meantime, I was very busy and did not have the time to write a proper post. The good news is at the moment, I am comparatively free and can put in a quick post. 

As said earlier, PyInstaller provides an option to encrypt the embedded files within the executable. This feature can be used by supplying an argument --key=key-string while generating the executable. 

Detecting encrypted pyinstaller executables is simple. If  pyinstxtractor is used, it would indicate this as shown in Figure 1.

Trying to extract encrypted pyinstaller archive
Figure 1: Trying to extract encrypted pyinstaller archive

Wednesday, 9 November 2016

Flare-on Challenge 2016 Write-up


The Flare-on challenge is an annual CTF style challenge with a focus on reverse engineering. Official solutions have already been published, besides that there are other writeups available too, hence I will just skim through the parts.

Challenge #1

The first was simple. This is base64 encoding with a custom charset. This online tool does the job.
Flag: sh00ting_phish_in_a_barrel@flare-on.com

Fig 1: Challenge 1

Wednesday, 7 September 2016

Pyinstaller Extractor updated to v1.6

PyInstaller Extractor is a tool to extract the contents of a windows executable file created by pyinstaller. This weekend I updated the tool to version 1.6. The new features which were incorporated include

  • Support for extracting pyinstaller 3.2
  • Extractor would now use a random name for extracting unnamed files within the CArchive
  • Preliminary support for handling encrypted pyz archives
The features are explained below.

Support for extracting pyinstaller 3.2

There has not been any format changes between pyinstaller 3.2 and the earlier versions. The previous versions works as is for pyinstaller 3.2

Handling unnamed files within CArchive

A Pyinstaller exe file can be visualized as of two nested archives. The outer layer is called CArchive. It is called so as it handled by C code i.e. the decompression of the layer is handled by a native stub written in C. The CArchive in turn contain another archive called PYZArchive along with other files. The PYZArchive is usually zlib compressed and is handled by python code and hence the reason for its name.

The CArchive usually contains the main script along with necessary dll files and python extension modules (pyd files). When running an pyinstaller exe, all dll and pyd files are written to a temporary directory to facilitate loading. (This behaviour is noticeably different from py2exe which loads dlls from memory.) The main script is never written to disk and hence it is possible to remove its name. If such is the case then the earlier versions of extractor would fail. The current version 1.6 will use a random name if it finds any unnamed files.

This feature has mainly been inspired while working on the PAN LabyREnth challenge (Threat #7).

Preliminary support for handling encrypted pyz archives

The files within the PYZ archive can be encrypted too. If such is the case, the tool would dump those files as is without attempting to process them. Previously the tool would fail trying to decompress encrypted data.

That's it. I would make a separate post to demonstrate how to extract encrypted pyz archives. It isn't difficult as the key to decrypt is present right in the CArchive.

Friday, 10 June 2016

Disk scheduling visualizer


Over the weekend, I developed a small python utility to visualize disk scheduling algorithms, particularly the way in which requests are serviced.

The algorithms implemented are SCAN & LOOK (not the circular versions i.e. CSCAN & CLOOK).

You can provide input, by modifying the below line in the code.
requestQ = [request(2, 0), request(156, 0), request(78, 0), request(192, 0),
            request(19, 30), request(127, 30), request(90, 30), request(100, 150),
            request(140, 150), request(60, 200)]
Each of the entry is a named tuple consisting of the track number, and the time of request.

You can change the algorithm to look or scan by modifying the corresponding line alg = AL_LOOK

It will display a formatted table showing the way the requests are serviced.

Sample output

Track Range : 0 - 199
Starting Track : 89
Starting Direction : LOW
Algorithm : LOOK

      TIME      |     TRACK
----------------|----------------
       0        |       89
       11       |       78
       70       |       19
       87       |       2
      175       |       90
      185       |      100
      212       |      127
      225       |      140
      241       |      156
      277       |      192
      409       |       60
Additionally, if you have matplotlib installed, it will render a graph too.

disk scheduling
Fig: Sample Screenshot

Wednesday, 11 May 2016

PjOrion Deobfuscator Open Sourced

Update (11-July-2017)


The project PjOrion Deobfuscator has been discontinued. This is superseded by bytecode_simplifier.

PjOrion is a python bytecode protector. While originally developed for obfuscating World of Tanks mods it can be used for pretty much any python code. What makes this protector special is that it works on the python bytecode itself. It tampers the bytecode making in un-decompilable and un-disassemble by standard tools.  For scripted languages like python, this is quite a significant improvement considering code protection in python was just a myth.

An example

Some time in 2015 bomblader posted a crackme on tuts4you. I will be using the same crackme to demonstrate the protection offered by PjOrion.

PjOrion breaks existing disassemblers by tampering the bytecode. For example, using the standard dis module on the obfuscated pyc file results in the following output.


Not only did the disassembler fail but also there are several invalid opcodes in the listing. For example the opcode 144 is invalid and non existent. When cpython tries to execute an invalid opcode, it throws an exception. Without an exception handler installed the program would crash. This is precisely the reason why the very first instruction is SETUP_EXCEPT. The purpose of the instruction is to set up an exception handler at bytecode offset 102 which will be called when an exception is thrown.

It is clear that we need to follow the exception handler to understand the program flow. For this I developed a trivial program which could trace the program flow.


From the above listing, it is clear that in addition to the invalid instruction at the beginning the code is splattered with unconditional jumps. The result of this is a spaghetti control flow as shown in Fig 1 or an even more extreme example in Fig 2.

Fig 1: Too many jumps!
Fig 2: Devilish CFG

Deobfuscating and beyond 

To deobfuscate such files, I developed a tool PjOrion Deobfuscator (@github). It is currently in pre- alpha stage and may even not work. There are many moving pieces involved which needs refactoring to make this workable. With time I aim to improve this tool.

The tools removes redundant jumps between the basic blocks as in Fig 3. However this is not as simple as it sounds and needs to recursively disassemble the code stream. I also incorporated some ideas borrowed from the LLVM project to optimize the cfg.

Fig 3: Redundant Jumps removal
After removing the redundant jumps, we need to reassemble the modified cfg. This is also quite a task as we need to re-compute all instruction offsets and the position of the basic blocks within the reassembled instruction stream.

For now, you can use the tool to generate a CFG which should help to better understand the bytecode. Be sure to have pydotplus and graphviz installed before using it.

I would like to reiterate once again that the tool is in a pre-alpha stage and may not work for your files. However, I definitely aim to improve this tool with time.

PjOrion Deobfuscator: https://github.com/extremecoders-re/PjOrion-Deobfuscator

Friday, 22 April 2016

Reversing the petya ransomware with constraint solvers

With the advent of anonymous online money transactions (read Bitcoin) ransomware has become a profitable business in the cybercrime industry. This combined with the Tor network hides the attackers identity. Further, low infosec literacy makes social engineering really easy. All you need to do is send an email with an attached word file for a failed FedEx delivery etc. The victim would download the attachment, run the word file, enable macros, all without thinking a bit.

Minutes later he/she would be staring at a screen that may look like this

The Petya lock screen
Fig 1: The Petya lock screen

In panic, the hapless user may call his tech friend or google (seriously?) and be convinced that he/she has really lost all data. Now either he/she heed to the attacker's demands and pay the ransom or just forget it. Paying the ransom is however not too easy. There is no paypal, no credit card. The attackers accepts payments only in bitcoins and you also need to install the so called tor browser. This is the end of the road for many.

For us reversers, this is not the end. We try to find out if the user can have his/her data recovered WITHOUT paying the ransom. However this is not always possible particularly if the malware coders are experts. If not then we may have a way in just as was the case of the Petya ransomware which is the topic for today's blog post.

Preliminary Analysis

The sample on which the analysis has been done can be found here
The malware is different & unique from typical ransomware as it does not encrypts file. Instead it encrypts the MFT (Master File Table) on NTFS volumes. In short, on NTFS the MFT is a table which contains information about each and every file on the partition. For small files, the file content may be stored entirely within the MFT. For larger files, it contains a pointer to the actual data.

Encrypting the MFT is advantageous in the sense that the operation is very fast. You do not need to recursively traverse the entire drive to find the files. The files are there on the disk but the system does not know where to find them. This is as good as having the individual files encrypted.

The downside of having the MFT encrypted is the malware will need to be low level & sophisticated. Since the system cannot boot the OS a custom bootloader has to be developed. The code has to be 16-bit running in real mode. It has to use the BIOS interrupt services to communicate with the user. This is not an easy task considering we are used to develop in 32/64 bit with memory protection, segmentation and other niceties by the OS. In real mode we are responsible for everything.

Initial Triage

My favourite OS for reverse engineering tasks like this is old and trusty Windows XP. However for reasons unknown I could not get this sample running. Hence, I had to resort to a Windows 7 SP1 x86 VM. Running the sample leads to a BSOD after some seconds.

Blue Screen Of Death
Fig 2: The BSOD
This BSOD is generated entirely from user mode by calling an undocumented API NtRaiseHardError. On the next boot a fake chkdsk scan starts to run.
Fig 3: The malware is hiding its action behind the fake scan.
In reality, the malware is doing its dirty work of encrypting the MFT. The chkdsk is just a decoy. When done we are presented with the redemption screen as in Fig 4 and then Fig 1. However it is not that scary as it looks :).

SKULL
Fig 4: Danger Ahead!

Carving the mal-bootloader from disk

To perform static analysis we need the malicious bootloader. Since I have used vmware here, the easiest way would be to attach the vmware disk image (vmdk) to another virtual machine and use a tool like Active@ Disk Editor as in Fig 5. I have also developed a 010 editor template for parsing vmware disk images directly and can be used just in case.

Active Disk Editor in action
Fig 5: Active Disk Editor in action
We need to the extract the sectors (first 10,000 sectors ~ 5 MiB should be more than enough) to a separate file.

IDA & Bochs

For static analysis we will be using IDA (no surprises). For dynamic analysis we will be using the Bochs debugger. Although vmware can debug bios code & bootloaders by its gdb stub but it is quite a pain to use efficiently. Hence we will stick with bochs. IDA provides first class support for bochs. Further running bochs is lot snappier than powering a full fledged vmware vm.

You can get the bxrc file (bochs config file) here. We can now load the bxrc file in IDA and it automatically do the rest.

The initial malware code
Fig 6: The initial malware code
The malware copies 32 sectors starting from sector 34 to 0x8000 and jumps to it as in Fig 6.

To encrypt or not
Fig 7: To encrypt or not

Among other things, it reads sector 54 to a buffer. If the first byte contains 0 it proceeds to encrypt. If not it displays the ransom screen as shown in Fig 7. Hence the first byte of sector 54 is used mainly as a flag to decide its further course of action.

Analyzing the decryption code

We will be focussing primarily on the decryption algorithm. After all we are more interested in getting our data back than figuring out how it got lost. The process is simple, it reads a string, checks it and if it is valid decrypts our data.

Read & Check key
Fig 8: Read & Check key
It accepts a key of maximum length 73 characters, but only the first 16 of them are used. The characters which are accepted consists of 1-9, a-z, A-X. After this the 16 byte key is expanded to a 32 byte key by adding 122 and doubling consecutive characters respectively. This is shown in Fig 9.

Expanding the key
Fig 9: Expanding the key
Next we reach the crux of the malware. It reads some data from sector 54 & 55 and passes them to the Crypt function. Using the 32 byte decryption key and an 8 byte Initialization Vector (nonce) from sector 54 it decrypts the 512 bytes of data in sector 55. If our key is correct, all byte in the decrypted data must equal all 0x37.

Calling Crypt
Fig 10: Calling Crypt

Finding the encryption algorithm

The encryption algorithm used is a variant of the Salsa stream cipher. I call this variant because properly implemented Salsa is quite secure. Well, how do we know this is Salsa? From magic constants, of course. See Fig 11.

expand 32-byte k
Fig 11: expand 32-byte k
Searching for "expand 32-byte k" would directly lead you to Salsa. The exact code used in the malware can be found here. I am using the word exact in a broad sense. If it had been a ditto copy, we would have no chance of breaking it. The original Salsa implementation uses 32 bit (uint32_t) variables. This salsa implementation uses 16 bit variables for the same purpose borking it badly. Here is a snippet of the borked version. You can get the full version here. Compare this to the original version.


The primary reason for the mess up can be attributed to the fact that all of this is running in 16 bit real mode. So the authors decide to go easy and implement the exact same algorithm but with 16 bit variables.

Breaking the algorithm

We already have the entire algorithm in source code.  We need to fire up our tools to go & break it. These days, my defacto tool for such analysis has mostly been angr. However angr failed to work in this case. This is expected as the framework is in a continuous state of development. Not spending time on finding why it failed, I decided to look at other options. I used KLEE. It did not fail but took a long time and never finished. Next, some wild cropped up and I decided to use fuzzing based approach. For this I used the AFL framework. No luck here too.

Lastly I decided to use the tried and tested Z3 constraint solver and it did  not disappoint :). We already have the source, we just need to implement it in Z3. The code is as follows.

The program has  to be provided with the 8 byte nonce from sector 54. and 64 bytes from sector 55 after xoring with 0x37. The remainder of the program is a literal transcription of the c source and hence not explained. Running the program we get our decryption key in a few milliseconds. Apply the decryption key & hope for the best.

Fig 12: Mission accomplished!
Mission accomplished.

References

  • http://blog.trendmicro.com/trendlabs-security-intelligence/petya-crypto-ransomware-overwrites-mbr-lock-users-computers/
  • http://www.bleepingcomputer.com/news/security/petya-ransomware-skips-the-files-and-encrypts-your-hard-drive-instead/
  • https://github.com/leo-stone/hack-petya
  • http://pastebin.com/Zc16DfL1

Friday, 1 April 2016

Solving kao's toy project with symbolic execution and angr

Kao's toy project is a nifty and small crackme and quite ideal for demonstrating the power of symbolic execution. Running the crackme provides us with an installation id. We need to enter an unlock code which shows the goodboy message.

The main window
Fig 1: The main window
The installation id is calculated from the hard disk serial number. We will not focus on the algorithm that generates the installation id but rather on developing the keygen which calculates an unlock code when given an install id.

Before discussing about the function which checks the validity of the entered unlock code, it is important to mention that the installation id is 32 bytes (8 DWORDS) long and is displayed on the crackme screen in the form
D1D0-D3D2-D5D4-D7D6

i.e. within each QWORD the two DWORDS are stored in little endian order. We need to take this into account in our keygen program and convert the entered installation id to the proper form.

Previous Work

This crackme has previously been solved by Rolf Rolles who used a similar technique mentioned here in this blog post. While the method involving SMT solver is similar, Rolf used semi-automatic techniques, which translated the assembly code to IR and finally generated the constraints from the IR.

Before Rolf Rolles, this was solved by andrewl & Dcoder who used cryptanalysis techniques to reduce the keyspace. More recently, this was solved by Cr4sh who used the openreil framework.

The heart of the crackme

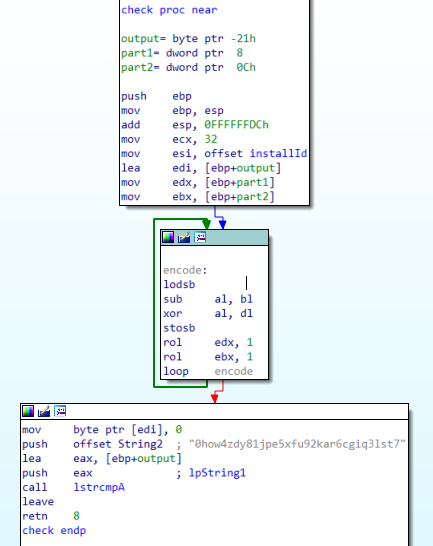
At the heart of the crackme lies this small function which checks whether a given unlock code is valid or not.
Control flow graph of the checking function
Fig 2: The checking function


The function takes two dwords (from the unlock code) as arguments which are then used to encode/encrypt the installation id (plaintext) to a given output buffer(ciphertext). For our entered unlock code to be valid, the encoded output must match the hardcoded string 0how4zdy81jpe5xfu92kar6cgiq3lst7.

Solving with Z3

At first we will try to model the system in Z3. Specifically, we will represent the encoding loop in Z3. Then we will use Z3 to solve the system and find the two dwords (unlock code) which encodes the installation id to the hardcoded string.

The script takes in the installation id as a command line argument. Lets' walk through the code step by step.
install_id = getInstallIdFromString(sys.argv[1])
Here we convert the install id into its proper form i.e the order of the two DWORDs within each QWORDs is reversed and returned as a list of integers.
target = map(ord, list('0how4zdy81jpe5xfu92kar6cgiq3lst7'))
After encoding the installation id it must match with the hardcoded string. Here we are converting the that string to a list of characters where each character is represented by its ASCII value.
part1 = edx = BitVec('part1', 32) 
part2 = ebx = BitVec('part2', 32)
We declare two bit-vectors of with a size of 32 bits each. These two bit vectors represents the two DWORDS of the unlock code.

for i in xrange(32):
    # text:00401105 lodsb
    byte = install_id[i]
        
    # text:00401106 sub al, bl
    byte -= Extract(7, 0, ebx)
    
    # text:00401108 xor al, dl
    byte ^= Extract(7, 0, edx)

    # text:0040110B rol edx, 1
    edx = RotateLeft(edx, 1)
        
    # text:0040110D rol ebx, 1
    ebx = RotateLeft(ebx, 1)
        
    # Add constraint
    s.add(byte == target[i])

The above loop describes the encoding process. Each character of the install_id is processed. This value must match the corresponding character in the target list. For this we use constraints.

# Solve the system
if s.check() == sat:
    m = s.model()
    print 'Unlock Code: ',
    print '%08X-%08X' %(m[part1].as_long(), m[part1].as_long () ^ m[part2].as_long())

Finally, we ask z3 to solve the system. and print the solutions.

Solving with angr

Okay we have already solved the crackme, so why another method? This is because I wanted to see if we can use angr for the same purpose, besides it would be a good learning experience.

Lets look at the cfg once again
Calling the check function
Fig 3: We want to execute the green basic block and avoid the red one

At 40122A function check is called. If our entered unlock code is correct check would return 1 and we would go to the green color basic block at 401234 which displays the good boy message.

Now to the cfg of the check function.
Control flow graph of the check function with hooks
Fig 4: Inserting hooks inside the check function

We are going to execute the above function symbolically. The unlock code which is comprised of two parts are passed as arguments to the function. Since we are executing this function in isolation we need provide the inputs ourselves, and this can be done by setting a hook at 4010FF (set_ebx_edx). Within the hook, we would store symbolic values representing the two parts of the unlock code into the ebx and edx registers.

Lastly, at 40111D there is a call to lstrcmpA. This function is imported from kernel32.dll.  Now, within our execution environment this dll is not loaded, we must emulate the behaviour of lstrcmpA and this can be done with SimProcedures.
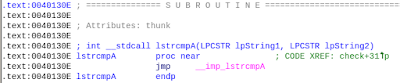
Imported lstrcmpA function
Fig 5: lstrcmpA function

lstrcmpA is located at 40130E. We would set a hook at this location to call a SimProcedure which emulates the behaviour of lstrcmpA.

Now lets see the code which implements all of these.
Finally to wrap things up, here is an asciicast showing the solver in action.

Wednesday, 9 March 2016

Revisiting find the flag crackme (Part-1)

Some time ago, I posted a CTF style challenge on tuts4you.

The goal of the crackme was to find the flag which prints the goodboy message. Although the crackme was solved pretty quickly and all the provided solutions were of good quality, I wanted to explore if it can be entirely solved by automation, requiring as few manual interventions as possible. Today's post is thus an attempt in that regard.

The challenge

For the purpose of this post, I have somewhat simplified the challenge. The original crackme sported self modifying code (SMC), with pairs of encryption/decryption loops. The challenge for demonstration in this post contains no SMC. Further it contains only 30 equations instead of the original 100.

To make it easier to follow, I am providing the source used in this challenge.

This can be easily compiled to an ELF.

ec@ubuntu:~/Desktop/crackme$ gcc findtheflag.cpp -o findtheflag
ec@ubuntu:~/Desktop/crackme$ 
ec@ubuntu:~/Desktop/crackme$ ./findtheflag
----------Find the flag: By ExtremeCoders, Nov 2015----------
Enter your flag: 
flag{Y0u_s0lved_that_r1ght!!!}
That's it!
ec@ubuntu:~/Desktop/crackme$ 

Okay, that's not guesswork, we already know our flag, but let's see how we can find the flag.

The disassembly


Using IDA, we can see the structure of the challenge. It accepts the flag via fgets. This is stored in the global variable f. The function check, checks whether the provided flag is correct or not.

Moving onto the function check, we can see that it's quite big, comprising of a large number of basic blocks. Our target of this post would be to see if we can find out the flag without inspecting the code.


Enter symbolic execution

Quoting Wikipedia, "symbolic execution (also symbolic evaluation) is a means of analyzing a program to determine what inputs cause each part of a program to execute. An interpreter follows the program, assuming symbolic values for inputs rather than obtaining actual inputs as normal execution of the program would, a case of abstract interpretation. It thus arrives at expressions in terms of those symbols for expressions and variables in the program, and constraints in terms of those symbols for the possible outcomes of each conditional branch." 
Thus symbolic execution is a way of running a program using symbolic values instead of providing concrete values. For instance, consider the following snippet of x86 assembly.

add eax, 0xDEADBEEF
xor eax, 0x1337
shr eax, 0x3

Let's say register eax initially contained the value 0x41414141. After executing these three lines it would contain 0x03FDE260.
Now suppose we are given that eax contains 0x31337 after executing the snippet. Can we find out what was the initial value of eax ? Of course we can, and we need to invert the algorithm for this.

shl eax, 0x3
xor eax, 0x1337
sub eax, 0xDEADBEEF

By running the snippet we can find that eax must hold the initial value 0x216ACBA0 for the given target value. The example above consisted of only 3 instructions. Inverting a huge algorithm consisting of a few hundred instructions would certainly not be a pleasant experience. It is then when symbolic execution proves fruitful. If we represent the entire system symbolically, we can see how a given initial value affects the execution and we can certainly find out the initial value when given a target value.

Using Z3 SMT Solver

For represent the above 3 instruction system symbolically we can use Z3. We will use the python bindings.
#!/usr/bin/python
from z3 import *

# Declare a 32 bit vector representing register eax
reg_eax = BitVec('eax', 32)

# add eax, 0xDEADBEEF
eax = reg_eax + 0xDEADBEEF

# xor eax, 0x1337
eax = eax ^ 0x1337

# shr eax, 0x3
eax = eax >> 0x3

# Create a solver instance
s = Solver()

# Add the constraint
s.add(eax == 0x31337)

# Check if satisfied
if s.check() == sat:
 # Print value
 print hex(s.model()[reg_eax].as_long())

You can download the above code from here. Running the code you can easily see that eax must hold the original value of 0x216ACBA0 for the given target value of 0x31337.

Stay tuned for the next part...